Briefly speaking, a Bill of material (BOM) can be defined as the ingredients with their quantities needed to manufacture a product. It may have various levels of the components to make substructures with in the BOM of an overall refined product.
Our intention through this tutorial is to demonstrate a procedure where we could investigate the items required for manufacturing a product e.g. a lamp, consolidating these items on various levels and on the basis of quantities into a rough BOM description, and then finally creating this BOM into the ERP system like Dynamics Axapta 2009. So let's begin with understanding of BOM creation in Inventory management module. We have taken a scenario of customer customizable lamp because through using this scenario we want to discover as many options in AX as possible like in Production, Product Builder, Inventory Management, Sales Order, Purchase order modules. However, reader can choose any other scenario as the interest may be.
1. Customizable Lamp Overview
Please go through the PDF document on the link for understanding basic structure of custom lamp and how different parts, or substructure compose together to make an overall finished product called a customer customizable lamp.
An overall perspective can be studied through the quoted abstract: "A customer-customizable lamp includes a vertical support post mounted to a base plate. The customer selects from five different heights of decorative blocks to be mounted on the post. Each selected block may be provided in any one of five selectable colors or four selectable simulated wood grains. The selection of blocks and finishes are made on a web page with an interactive representation of the customizable lamp being displayed as the design is being created by the customer. The remaining height on the support post to be filled with decorative blocks is displayed. Once the post is filled and the customer has selected finishes for each selected block, the lamp design can be finalized for delivery to the customer. The customer selectable blocks and colors/finishes permit several million permutations so that the customer can create a highly individualized decorative lamp."
2. Investigating for Bill of Material (BOM) for lamp as a product designer
As we can see from reading above abstract of customizable lamp that the choice by customer is made either based upon colors or four selectable wood grains. Please go through below text and figures 1, 2 and 3 to understand further the building blocks of this customizable lamp.

Fig 1 - Customer Customizable Lamp
"[0009] In one embodiment of the invention, a customizable lamp base 10 is provided as shown in FIG. 1. The base 10 includes a base plate 12, a support post 14 and a light fixture 16 that is configured to support a lamp shade (not shown) and a light bulb B. The base plate 12 preferably includes a plurality of feet 20 adapted for supporting the configurable lamp on a table surface. Most preferably the feet 20 are formed of a rubber or similar material to prevent the lamp from slipping on the table surface.
[0010] The base plate 12 defines a hole 22 that is preferably centrally located within the plate to provide a stable support for the remainder of the customizable lamp. In a preferred embodiment, an externally threaded collar 24 is disposed within the hole 22, with sufficient clearance to accommodate the lower end of the support post 14. The collar 24 includes external threads 26 that engage internal threads 32 at the lower end 33 of the post 14 to form an interface for connecting the post to the base plate. The collar 24 can include a plurality of tabs 28 extending radially outwardly for engagement with the underside 21 of the base plate 12. Fasteners 29, such as screws or tacks, can extend through openings in the tabs to fasten the collar 24 to the base plate 12.
[0011] As indicated, the support post 14 includes internal threads 32 at the lower end 33. Preferably, the hole 22 in the base plate 12 provides a close fit relative to the outer diameter of the post 14. For instance, in one specific embodiment, the post has an outer diameter of 1.48 inches, while the hole 22 has a diameter of 1.50 inches. This close fit helps ensure a tight construction of the finished customizable lamp.

Fig 3 - Customizable Lamp
[0012] The post 14 defines a tubular channel 30 along the length of the post for passage of an electrical power cord 50extending from the light fixture 16. The light fixture 16 includes a threaded stem 40 that is adapted to engage internal threads 34 at the upper end 35 of the support post 14 to form an upper interface for connecting the light fixture to the post. The fixture includes a bulb support 42 that is configured for threaded engagement with a light bulb B. The fixture 16 may also be configured as necessary to support a lamp shade in a known manner, as depicted in FIG. 3. The fixture 16 includes a collar 44 that has a diameter larger than the outer diameter of the support post for reasons explained below.
[0013] The light fixture 16 provides electrical connection for the power cord 50. The power cord 50 extends through the tubular channel 30 of the support post, through the threaded collar 24 and beneath the base plate 12. The cord terminates ina plug 52 and preferably includes an integral switch 54. The tubular channel 30 is sized to permit passage of the plug 52 and switch 54 therethrough.
[0014] In accordance with one aspect of the present invention, the customizable lamp is customized by the customer on a web site, as illustrated on the screen print of FIG. 3. The customer thus orders the components of the lamp on the web site, the components are delivered to the customer, and then assembled. Thus, the base plate 20, support post 14 and light fixture 16 are shipped unassembled, although the threaded collar 24 is preferably pre-installed on the base plate. These components can be readily assembled without tools, by first threading the post 14 onto the threaded collar 24 extending through the opening 22 in the base plate 12. As explained in more detail below, the light fixture 16 is not immediately threaded onto the post.

Fig 2 - Customizable Lamp
[0015] In accordance with one important feature of the invention, the exterior appearance of the lamp is completely customizable by the customer. In particular, the present invention contemplates an array of differentially sized decorating blocks 60a, 60b, 60c, 60d and 60e. All of the blocks include a central hole 62 extending therethrough. The hole 62 is sized to fit snugly over the support post 14, as represented by the arrow in FIG. 2. Thus, in the specific embodiment described above, the holes 62 can have a diameter of 1.50 inches, which is slightly larger than the 1.48 inch outer diameter of the post 14."
3. Creation of Bill of Material (BOM) for lamp
I. Consolidation of items at different levels
As a product designer, one has to create a Bill of Material (BOM) for this customizable lamp product. Let's first define how can he identify which parts need to be Item type and which need to be BOM type. A component needs to be BOM type if it is composed of further components or/and needs Tracking, Storing and Selling independently. From the description of custom lamp given, the first step would be to identify potential BOM, Sub-BOM and Item type ingredients from the given description of a product like custom lamp in our scenario. The potential elements to a BOM i.e. the basic ingredients or parts or components which will make this lamp are highlighted above. Yellow highlighted is main BOM item. Green can be sub-BOM (substructures) and pink highlighted are potential candidates for Item type. Light green can be item specific configuration.
Ingredients of type BOM and sub-BOM, and similarly Item type can be consolidated separately at different levels as below:-
- Item type: BOM; Custom lamp (the main product), Lamp base, Lamp decorative block, Lamp shade (three substructures at same level), and Lamp base dividing further into Lamp base plate, Lamp support post, Lamp light fixture (at same level) as these are composing further components or can be configured. These level definitions are based upon composition of individual item on other sub-components. For example, Lamp base contains further components as base plate, support post and lamp light fixture.
- Item type: Item; We can further associate items to the sub-BOM types as defined in point 1. Lamp base plate further can contain/relate Lamp externally threaded collar, collar tabs and fastners. Similarly, Lamp light fixture can have threaded stem, bulb support, collar, power cord, plug, bulb support, and switch.
Based upon conslidation on level-basis, we have a BOM table as below. Please look specifically into Item number pattern based upon level column. Lamp should be at level 0 as main product of type BOM and can have Item number as 5000. Then at level 1 we should have Lamp base (5000-10), decorative block (5000-60) and lamp shade (5000-SH) as defined in point 1 above. Further at level 2, we can divide the sub-BOM of level 1, and since lamp base in our case can further be divided so we have base plate (5000-10-12), support post (5000-10-14) and light fixture (5000-10-16). You can note that our item numbers are also conveying the respective levels of individual items. This will be useful in identifying the associations of items to sub-BOMs, and sub-BOMs to main BOMs.
In this table, we have also identified the Qty of individual items required to produce the sub-structure which will further make the main product. So 3 collar tabs are required for substructure "base plate" and each will also need a fastner, so 3 fastners to 3 collar tabs will be required. Similarly, 4 feet will be required to Lamp base substructure. Finally, 5 decorative blocks of varying sizes will be required to make this custom lamp. The composition based upon varying sizes i.e. heights will fit into a specific lamp height is another topic which will be discussed in Product builder tutorial.
Item Number | Item Name | Level | BOM unit | BOM qty | Per Series | Purchase/Cost price per piece in USD |
| 5000 | Custom Lamp | 0 | Pcs. | - | - | - |
| 5000-10 | Lamp base | 1 | Pcs. | 1 | 1 | |
| 5000-10-12 | Lamp base plate | 2 | Pcs. | 1 | 1 | |
| 5000-10-12-24 | Lamp ext threaded collar | 3 | Pcs. | 1 | 1 | |
| 5000-10-12-28 | Lamp collar tabs | 3 | Pcs. | 3 | 1 | |
| 5000-10-12-29 | Fasteners | 3 | Pcs. | 3 | 1 | |
| 5000-10-14 | Lamp support post | 2 | Pcs. | 1 | 1 | |
| 5000-10-14-30 | Lamp support post tubular channel | 3 | Pcs. | 1 | 1 | |
| 5000-10-16 | Lamp light fixture | 2 | Pcs. | 1 | 1 | |
| 5000-10-16-40 | Lamp LF threaded stem | 3 | Pcs. | 1 | 1 | |
| 5000-10-16-42 | Lamp LF bulb support | 3 | Pcs. | 1 | 1 | |
| 5000-10-16-44 | Lamp LF collar | 3 | Pcs. | 1 | 1 | |
| 5000-10-16-50 | Electrical power cord | 3 | Pcs. | 1 | 1 | |
| 5000-10-16-52 | Lamp plug | 3 | Pcs. | 1 | 1 | |
| 5000-10-16-54 | Lamp integral switch | 3 | Pcs. | 1 | 1 | |
| 5000-10-16-B | Lamp LF bulb support | 3 | Pcs. | 1 | 1 | |
| 5000-10-20 | Lamp base feet | 2 | Pcs. | 4 | 1 | |
| 5000-60 | Lamp decorative block | 1 | Pcs. | 5 | 1 | |
| 5000-SH | Lamp shade | 1 | Pcs. | 1 | 1 |
Now based upon the above BOM table, we have defined items in DAX 2009 module Inventory management> Item details form (Fig 4). Item type can be either BOM type or Item type in our scenario; third option "Service" is not applicable here. So we have defined various items selected as potential BOM candidate as in above table in Item form so that they can be further selected for BOM as you'll see how we proceed on this.

Fig 4 - Components for Custom Lamp [Item/BOM type]
While defining each item, we have defined Item number, Item name, Item type as discussed above. Furthermore, Item group, Inventory model group, and Item dimension group have also been defined.
Item group categorizes an item so that these groups can be utilized for many functional aspects like product costing in manufacturing process. We will define an Item group "Packaging" and associate with each item. Item group can be defined in InvtMgmt module>Setup> Item group form as depicted below.

Fig 5 - Inventory management module > Setup > Item group form
Similary, inventory model group (as depicted below) are various calculation methods to calculate cost of goods sold so to end the inventory at the period end since inventory purchase prices fluctuate which results in varying inventory costs. Generally, there are four inventory cost flow methods such as; Specific identification, First-in, first-out (FIFO), Last-in, first-out (LIFO) and Weighted-average. However, Dynamics AX 2009 has six such methods namely FIFO, LIFO, Weighted avg., standard cost, LIFO date, Weighted avg date which in principle are same four methods. Inventory model group can be defined through InvtMgmt module > Setup > Inventory > Inventory model group form. After defining there, it can be selected in General tab of Item details form to a specific item.
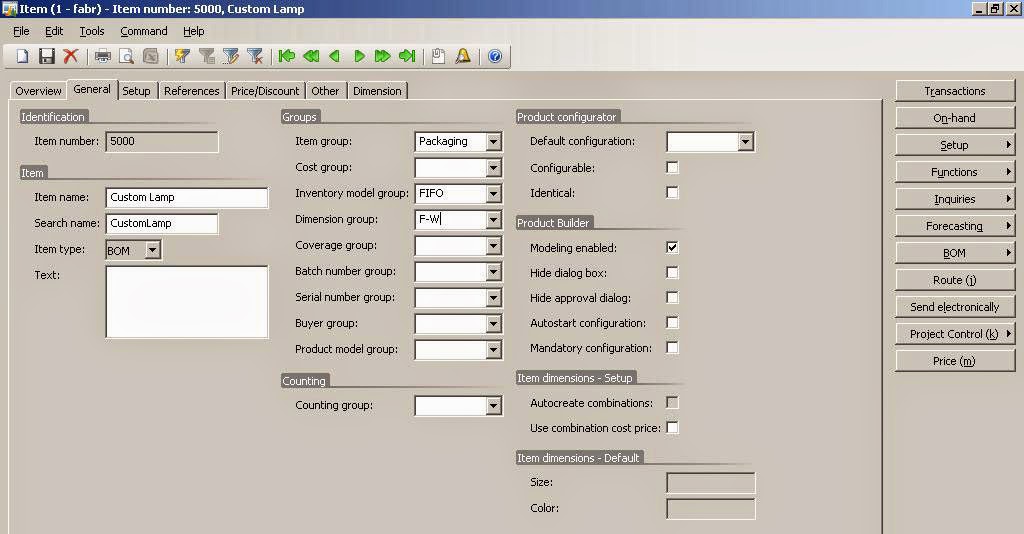
Fig 6 - Item form > General tab > Item group, Inventory model, Dimension Group
Inventory dimension group defines Color, Size and Configuration requirements if applicable to an item. An item may have a size, color and configration associated with it. So until an item is not associated with such an inventory dimension group, the option to define each of these three properties are not enabled on Setup button on the right hand in Item details form. Similarly, this dimension group may also have storage dimensions like Site, Warehouse, Batch no etc.
We have defined three inventory dimension group namely CFS-W (Color-Configuration-Size-Warehouse), CF-W (Color-Config-Warehouse) and F-W (Config-Warehouse) and activated by checking Active field in Item dimensions - activation and setup grid below appropriately according to these three options. We've further associated these dimenion group to individual items based upon their requirements. Like associated F-W to the majority of items as minimum specifications, and CFS-W to items like Decorative blocks, and lamp shades, since both of these items will have Color, Configuration and Size requirements.

Fig 7 - Item dimension groups
When let's say we have associated CFS-W dimension group to the item decorative block, the option of Configurations, Sizes and colors are enabled on clicking Setup button in Item details form as shown below. Similary, Item dimension combination option is also shown. Each of these options will launch corresponding forms.

Fig 8 - Lamp Decorative Block: Item form > General tab > Setup button > Defining configurations, colors, sizes and automatically generating item combinations
The figure 9 below shows Configuration form where we have defined Squared configruation for a decorative block item. Many configuraitons may be added.

Fig 9 - Defining Configurations for Lamp Decorative Block: Item form > General tab > Setup button > Configuration
We have also defined colors and patterns in the color form as below for the decorative block item. You may add as many as you want.
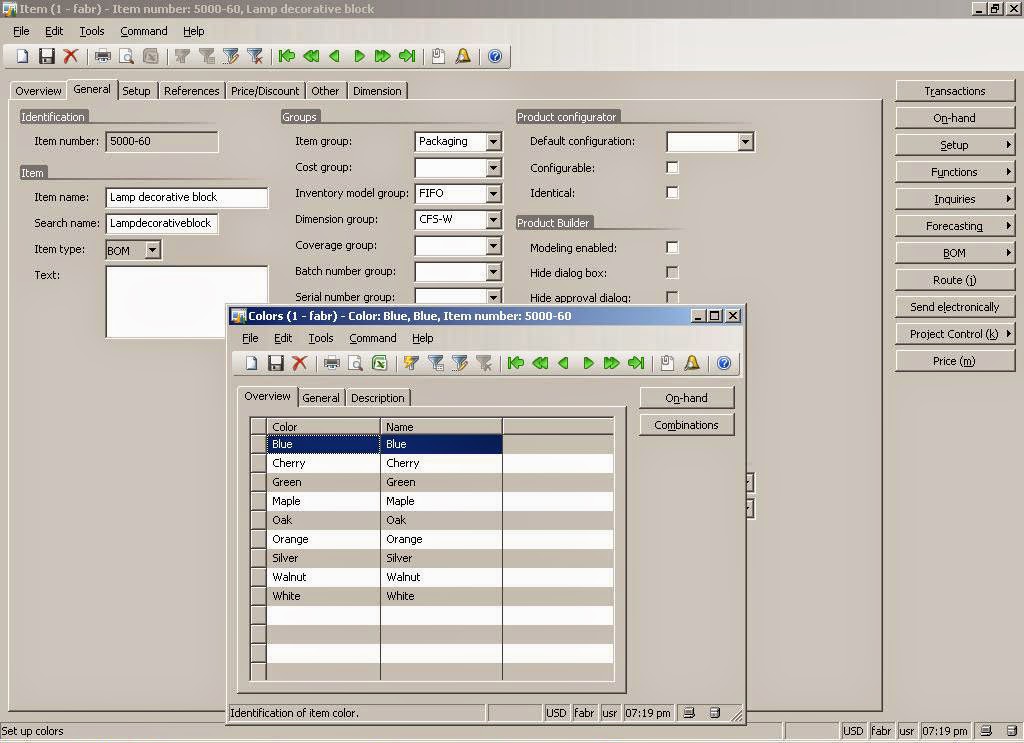
Fig 10 - Defining colors for Lamp decorative block: Item form > General tab > Setup button > Color option
Decorative block items of squared shape are same in width and length, but vary in heights and these heights variation will be factor to select any of 5 decorative block to fit into specific height of a lamp. We have defined height (in inches) as size into Size form as shown below.

Fig 11 - Defining sizes for Lamp decorative block : Item form > General tab > Setup button > Sizes option
After defining, Configuration, Color and Size dimensions, we can launch Item dimension combination form via Item details form > Setup button > Item dimension combinations. Here we can click on Create combinations button to automatically generate the combinations based upon these dimensions. The dialog box which appear on Clicking combinations button, gives a user flexibility to choose specific dimensions or Select all. You can see the resultant combinations as in below figure 12 when we have selected all three dimensions and their possible values.

Fig 12 - Automatically generating Item dimensions combinations for Lamp decorative block: Item form > General tab > Setup button > Item dimensions combinations
Now it is the time to define BOM and sub-BOMs when we are done with defining items, and their dimensions. The BOM (Bill of materials) form can be found on path InvtMgmt module > Common forms > Bill of material form. On launching it, you can see there are two parts of this form; one above with a grid to hold various BOM headers which will contain BOM names, Site information and Approver name when Approved checkbox is checked finally. The below portion contains versions information which is used to associate a specific item with a BOM. So for example, until and unless a custom lamp item is not associated with a BOM for custom lamp and approved and activated, the item lamp will not know which BOM it will use. On the right side, various buttons are displayed and Lines button here is relevant since there we'll defined the various lines associated with a specific BOM.

Fig 13 - Bill of materials for lamp, and its substructures (sub-BOMs)
We have started with sub-BOM first, and lastly with BOM definition. BOM definition must contain BOM header information, Version, and mainly its BOM lines. A light fixture sub-BOM item, may have as many as six lines as shown in figure 14 below. We can select item associated with this sub-BOM type on each BOM line, its quantity to make that sub-BOM or BOM and Per series qty. Per series qty is always 1 in our case. (What is Per series: When a BOM item is referred in let's say 100-pieces package and 5 such component BOM item makes it, so we would have defined it as Qty =5, Unit=Pcs, and Per series=100). Additionally, with each sub-BOM we define a separate Configuration group except in case of main BOM item i.e. custom lamp where we'll define different Config, Size and Colors in respective fields.
The BOM lines specifications for a light fixture substructure is shown in the figure 14 below.

Fig 14 - BOM for lamp light fixture
By using configuration groups, you can create bills of materials where the program, by using a bill of material, selects a particular BOM line based on the specified configuration group. The BOM item must be attached to a Inventory dimensions (form), where the Active check box is selected in the item dimension Configuration. The configuration groups created for our scenarios are as below (InvtMgmt> Setup > Bill of material > Configuration group form ).

Fig 15 - Configuration groups
The BOM lines defined for a custom lamp item's BOM are as below. As we can see, these lines represent substructures like base, decorative block and a shade having Config, Config-Size-Color, and Config-Size-Color respectively. Each of these items are also sub-BOM having separate BOM lines. This is shown as icon in Item type. We could define as many Config, Size and Color combinations as possible over here which will later be available to Sales order form as we'll see later in this tutorial. You can note in BOM lines of lamp below that Qty = 5 for decorative block item BOM line. So remaining BOM lines have Qty=1 and the combination of 5 dec. blocks will be composed depending upon their heights to assemble a custom lamp.

Fig 16 - BOM for lamp
The sub-BOM item Lamp base has 4 BOM lines as shown below. All of these except base feet are of type BOM as shown in Item type icon. However, base feet has Qty as 4 as opposed to other BOM lines where each one has Qty as 1 since this lamp can have 4 feet as described in beginning of this tutorial.

Fig 17 - BOM for lamp base
The substructure Lamp support post has only one BOM line as shown below.

Fig 18 - BOM for lamp support post
Lamp base plate sub-BOM has three BOM lines which all are of Item type item as shown in the figure 19 below. Here Qty of BOM lines associated with tabs and fastners are 3 for each counted in Pcs.

Fig 19 - BOM for lamp base plate
After we have defined sub-BOMs and lastly the main BOM for custom lamp item, we'll need to create a version and activate and approve that version against the approved BOM for that item. This process we'll need to do for each of items of item type = BOM. Once we are done with it we can have a last state of BOM form as shown in Figure 13 as above .
Lastly, we'll test our BOM and sub-BOM configuration through Sales order form (AR> Common forms > Sales order details) by defining a new sales order for a particular customer. We'll defined lines of this sales order and select item number as 5000 i.e. Custom lamp. Now on clicking Functions on line-level, Explode BOM option should be enabled; otherwise, we have problem with BOM definitions we just have finished and we should review those configuration once again until this option is enabled.

Fig 20 - Sales order line > Explode BOM function
When Explode BOM option is clicked (when enabled), it should show us Explode BOM form with sub-BOM which are the lines to the BOM associated with custom lamp (5000) item. Besides that we have defined Decent as Inventory configuration type for lamp item in Sales line tab i.e. Dimension. We could have defined various Inventory dimensions for this lamp item and associated Item configuration to such an Inventory dimension group to have various options available for a product such as lamp to the customer.

Fig 21 - Sales order line > Explode BOM function> Explode BOM form
(I'll further refine this tutorial based upon errors or omissions or further suggestions, so keep visiting it frequently for updates)
References
1. DynamicsAXTraining.com [http://www.dynamicsaxtraining.com/production_training/bills-of-material]
2. SimpleStudies.com [http://simplestudies.com/accounting-for-inventories.html]
3. AXForum.Info [http://axforum.info/forums/showthread.php?t=31331]
4. FreePatentsOnline.com [http://www.freepatentsonline.com/20090216658.pdf ]